Posts

Running Junit Cases with Jmeter(Basic)

Image
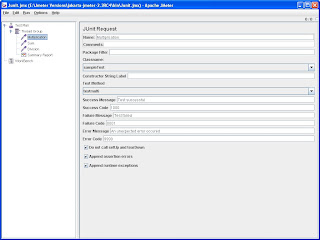
This post attempts to explain the basic design, functionality and usage of Junit Sampler for Jmeter. The sampler was introduced in 2.1.2 release of Jmeter. Earlier releases do not have the sampler. Design The current implementation supports standard Junit convention and extensions, like oneTimeSetUp and oneTimeTearDown. Other features can be added on request. The sampler works like the JavaSampler with some differences. 1. rather than use Jmeter's test interface, it scans the jar files for classes extending junit's TestCase class. This means any class or subclass. 2. Junit test jar files are copied to jmeter/lib/junit instead of jmeter/lib 3. Junit sampler does not use name/value pairs for configuration. The sampler assumes setUp and tearDown will configure the test correctly. Note: setUp and tearDown methods must be declared public, so that Jmeter can use it. 4. The sampler measures the elapsed time only for the test method and does not include setUp and tearDown

JMeter Ant Task

Image
We all know that the word Automation means, there should not be any human intervention for the task. Similarly w.r.t Jmeter we can achieve this by integrating with the ant build process. When ever a new code is checked in and build has happened then Jmeter should kick off immediately, run the scripts and produce the performance report, So now the question is how to do this? Answer is simple, 1.To use the task, you must have JMeter installed. You must also include ant-jmeter-1.0.9.jar in your Ant classpath. Adding the jar to $ANT_HOME/lib will make this happen automatically. 2.Set the jmeterhome parameter to your JMeter install location, and the resultlog parameter to the name of a file to log the test results to. You can either specify a single test plan using the testplan parameter, or multiple test plans using the testplans nested element. The testplans element is a standard Ant FileSet element. This is an Ant task for automating running JMeter test plans. The task execu

JDBC Testing with Jmeter

Image
Data base testing with Jmeter is simple. Here I am using Jmeter2.3 and Oracle 10g. Some of the things needs to be taken care before start testing. 1. Place the JDBC JAR file in --> Jmeter\lib folder (For Oracle 10g it will be classes12.jar) 2.Need to know the JDBC Driver class, If you don't know where to find the Driver class information, Open the Jar file using winzip or any tool for that matter and edit the OracleDriver.class in text file and there you can find the JDBC Driver Class.( oracle.jdbc.driver.OracleDriver) 3. Create Test Plan and add thread group. 4. Add the Config Element-->”JDBC Connection Configuration” and fill in all the required information, It should look like below figure. Fig 1 5. From the above figure notice that Variable name is highlighted, what ever name you give here will be shared with the "Jdbc request default". In my example I have given variable name as "SQL". Provide the JDBC Drive Class information which you got from Oracle

Ajax Testing with Jmeter

Image
Initially when I tried to do Load testing with Ajax I found that it was not an easy job to do, especially when DWR concept is involved, I didn't find any good solution on web, so decided to dig in and give it a try on my desk top and found that handling Ajax with DWR in Jmeter is pretty simple but not that easy. Here I am assuming that Ajax is implemented using DWR. Before start recording you need to consider which version of DWR is used, based on the version of DWR we need to choose the recording approach. This approach will vary with DWR 1.3 and above 1.3 So considering the steps involved for DWR version 1.3 1. Record the scripts as you do normally. 2. Have the listener "View result tree" which will help in debugging the scripts. Fig 1 From the above figure we can see that few of the DWR calls have been captured. One thing to be noticed is that right hand panel shows “Name/Value” pair and the method used is "POST". The value captured is in single line and ini